Fixing Problems with Gnome Indicator Applets

If you are using gnome 2.x and you have problems with your indicator applets not displaying properly after login.   I often do.   I don’t know the reason.  It occurs sporadically and more often than not.

A simple fix is to restart gnome-panel.  You don’t need to use sudo.  Open a terminal and run the following command.


$ pkill gnome-panel

That was easy–and is usually all you need to do.

However, if that didn’t solve your problem.  You can try reseting your panels and get pristine panels again.  WARNING:  If you have customized your panels by adding application launchers and etc, you will lose those setttings and have to customize them again.

Now that you have been warned, here are the steps to reset your panels.


$ gconftool-2 --recursive-unset /apps/panel

$ rm -fr ~/.gconf/apps/panel

$ pkill gnome-panel

I hope you found this post useful.

Configure Ubuntu to start in text mode

In my previous post I showed you how to add the gnome desktop to your Ubuntu server.   Suppose you want to configure Ubuntu to start in text mode rather then automatically starting the gnome desktop.  It is an easy change to make.  Here is how.

1) Edit /etc/default/grub.  Locate and change the following line.

change:

GRUB_CMDLINE_LINUX_DEFAULT=”quiet splash”

to:

GRUB_CMDLINE_LINUX_DEFAULT=”quiet splash text”

Then save your changes.

2) Run

sudo update-grub

The next time you reboot, Ubuntu will boot to text mode and you will see the console login screen (cmdline).  You can start the gnome desktop manually after loggging on by running “startx“.  When you logoff from the gnome desktop, you will be returned to the cmdline again.

Install a graphical desktop on Ubuntu Server 10.04 (without alot of extras)

Sometimes I find the need to install Ubuntu Server with a gnome desktop like the one that you get with Ubuntu Desktop.  You can install Ubuntu Server and then use apt-get to install the package ubuntu-desktop.  However, if you do that you will end up installing almost everything that comes with a Ubuntu Desktop installation.  This is not what I want.

What I really want is a  gnome graphical desktop running on top of Ubuntu Server and very little else.  Here is what I do.

Step 1:

Install Ubuntu Server

Step 2:

Logon and install the following packages.

$ sudo apt-get update

$ sudo apt-get install ubuntu-desktop –no-install-recommends

You will want the indicator applets.

$ sudo apt-get install indicator-applet-complete indicator-applet

If you want a web browser, a good choice is chromium.

$ sudo apt-get install chromium-browser

Step 3:

Reboot and enjoy.

That is all.

Fedora 15: Enable your laptop fingerprint reader

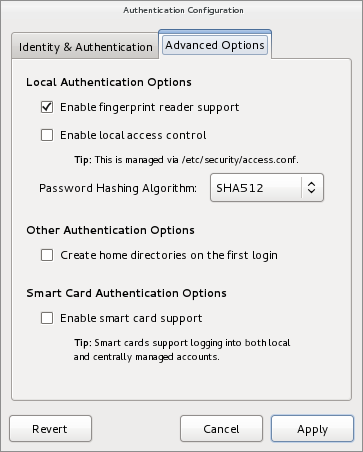
If your laptop has a built-in fingerprint reader, here is how to enable it for logins under gnome3.  In this example, I’m using a Lenovo T60 laptop.

Start the Authentication application.

On the advanced options tab,  enable the fingerprint reader.

Next open a terminal window.

Run fprintd-enroll with your username.  To record your fingerprint scan, it will ask you to swipe your index finger three times successfully.

That is all.  You can test by logging out and logging in again.  On the gdm login screen, select your username and select the icon for the fingerprint.  Then scan your right index finger and it should log you in.

How to prevent a Debian or Ubuntu package from being upgraded

Recently, I wanted to hold my virtualbox software at version 4.04 and prevent it from being upgraded.  If you use the gnome update-manager, you can always deselect the virtualbox  package in the GUI each time.  If you don’t like having to do that each time, I will show you two additional methods.  The first method using aptitude and the second method using dpkg/apt-get.  Choose one method or the other, the two methods are independent.

Method 1: Aptitude

Use aptitude to place a hold on a package and this will allow aptitude to upgrade everything else except packages that you have “held back”.

I’ll show you how to place a hold on the virtualbox package (virtualbox-4.0).

Start aptitude.

$ sudo aptitude

Your first action should always be to update your repo cache.  Hit the “u” key.

Next, search for virtualbox.  The “/” key will bring up a search box.  Enter virtualbox and hit enter.

If virtualbox is installed, aptitude should find it.

Hit the “=” key to place a hold on the virtualbox package.

You should see the flags “ih” now associated with the virtualbox package.  This means that virtualbox is installed and there is a hold placed on it.  It won’t be upgraded while it is held back.

Whenever you want to clear the hold flag, search and select the virtualbox package again and hit the “:” key.  That will remove the hold.

To upgrade your server.  Use the arrow keys to go to the top of the list and select the Upgradeable Packages.  Then hit the “g” key.

Hit the “q” key to quit aptitude.

Packages that are held back will still show in the Upgradable Package list whenever there are upgrades available for download.  If you try to upgrade it, it will be skipped.  As shown below.

If you prefer to use the cmdline, this is how to do everything that I just talked about, place a hold on virtualbox and upgrade everything (except virtualbox).

$ sudo aptitude update

$ sudo aptitude hold virtualbox-4.0

$ sudo aptitude safe-upgrade

And when you are ready to remove the “hold” placed previously on virtualbox and upgrade everything

$ sudo aptitude update

$ sudo aptitude keep virtualb0x-4.0

$ sudo aptitude safe-upgrade

Method 2: dpkg/apt-get

To place a hold on virtualbox and upgrade everything (except virtualbox).

$ sudo apt-get update

$ echo “virtualbox-4.0 hold” | sudo dpkg –set-selections

$ echo apt-get upgrade

To remove that hold on virtualbox and upgrade everything.

$ sudo apt-get update

$ echo “virtualbox-4.0 install” | sudo dpkg –set-selections

$ sudo apt-get upgrade

Summary

Whichever method you choose, please remember that each method is independent of the other.  In other words, if you use aptitude to place a hold on a package, then apt-get won’t see that hold.  If you place a hold using dpkg, then aptitude won’t see that hold either.   So remember to be consistent with whichever method you choose.  Yeah, it’s a bit nuts.

Useful nautilus extensions

I want to tell you about two useful nautilus extensions.  The first one lets you right-click on a folder and you get an option in the pop-up menu to open a terminal at that location.

The other extension allows you to right-click on a folder and you get an option in the pop-up menu to open as administrator.   This will open another nautilus window, running as root, at that location.  This is especially handy when you need root privileges for a quick task.   For example, when you need to  modify a folder or file which you don’t own.

Here is how you install both of these using the cmdline.

# sudo aptitude install nautilus-gksu nautilus-open-terminal

Close any open nautilus windows.  Now force nautilus to restart.

# pkill nautilus

You are done.  Any new nautilus windows that you open will have the new extensions whenever you right-click a folder.

Manage and Stream your Music Collection

One of the great open source projects for managing and streaming your music collection is Subsonic.  Subsonic is a web-based media streamer which provides online access to your music.  Some of its many features:

  • Listen to your music wherever you are. Share your collection with family and friends
  • Browse and manage your music collection with the user-friendly web interface
  • Stream music to AndroidiPhone andWindows Phone 7
  • Convert and stream lossless music on the fly
  • Manage 100,000+ files in your music collection without hassle
  • Get cover art, lyrics, reviews and other album info from Google, Chartlyrics, allmusic and Wikipedia

Subsonic is based on Java technology.  It is available for Linux, Windows, and Mac.

Installing VirtualBoxAdditions on Fedora 14

To install VirtualBoxAdditions on Fedora 14, you need to install a few a few additional packages.   In this example, I use a fresh install of Fedora 14.

Here are the packages that you will need.


sudo yum install perl dkms gcc kernel-devel kernel-headers

Now is not a bad time to update your kernel (though not required)


sudo yum update kernel

I reboot to the updated kernel.  Then I mount the VirtualBox Additions volume.


cd /media/VBOXADDITIONS_3.2.10_66523

sudo ./VBoxLinuxAddtitions-x86.run

It should install without issue.  You will need to reboot to enjoy the new additions.

Preventing normal users from using the su command

I was asked how to force normal users to use the sudo command and to never allow them use the su command.  The reason given was for auditing purposes.  The sudo command logs “who” and “what”, whereas the su command does not.

Here is one solution to the problem.  Remove the execute permissions for group others.


$ sudo chmod o-x /bin/su

Now create a rule in /etc/sudoers to handle a case where a user, identified by the username thomas, might try to run “sudo su”.


Cmnd_Alias SU = /bin/su

thomas ALL=(ALL) !SU


dumpe2fs/tune2fs: Manipulating the ext fs auto-check parameters

File-system checks are a good and necessary thing.  So I don’t wish to debate their appropriateness.  I just want to show you how to avoid them by manipulating the counters stored in the superblock of your ext3 and ext4 file-systems.   There are many setttings stored in your file-system’s superblock.  The ones that I a’m concerned with today are:

  • Mount count – Number of times the file system has been mounted
  • Maximum mount count – When this value is reached force a file-system check at boot
  • Last checked – Date of the last file-system check
  • Check interval – How often should file-system checks be done
  • Next check after – Based on the current Check interval when will the next forced file-system check occur.

You can display these values using dumpe2fs.  I have an ext4 file-system on a device named /dev/md0.

$sudo dumpe2fs -h /dev/md0 | egrep -i 'mount count|check'
dumpe2fs 1.41.9 (22-Aug-2009)
Mount count:              7
Maximum mount count:      29
Last checked:             Sat May  8 17:58:12 2010
Check interval:           15552000 (6 months)
Next check after:         Thu Nov  4 17:58:12 2010

I have used dumpe2fs a few times to check whether or not I can expect a lengthy file-system check pending on my next reboot.

Lets set the “Last checked” date to now.  In other words lets make it appear as though we have already completed a successful file-system check.

$sudo tune2fs -T now /dev/md0

Lets verify the results.  The “Next check” has now been pushed out to April.

$ sudo dumpe2fs -h /dev/md0 | egrep -i 'check'
dumpe2fs 1.41.9 (22-Aug-2009)
Last checked:             Sun Oct 24 12:20:43 2010
Check interval:           15552000 (6 months)
Next check after:         Fri Apr 22 12:20:43 2011

Similarly if you want to set the “Mount count” to a particular value (such as 6)

$sudo tune2fs -C 6 /dev/md0

To change the time based check interval to 3 months (90 days), use the -i option.

$sudo tune2fs -i 90d /dev/md0

If you have used tune2fs in an interesting way, post a comment and let me know.