Growing your RAID array

This is part 3 of a series of posts regarding setting up a linux RAID 5 disk array.  Let’s say you started your disk array with three drives and now you have more funds and you purchased an additional drive to increase the size of your disk array.  Adding a fourth drive to a three drive RAID 5 array will increase your storage space by 50%.  So you get a lot of bang for your buck.

Let’s continue with my example.  I started with three 1 TB SATA drives and now I’m adding a fourth 1 TB drive.  Before I had approximately 2 TB of storage, and after adding this fourth drive, I will end up with approximately 3TB of storage space.

Here are the basic steps that I will cover:

  • Partition the bare drive
  • Add the drive to your array as a spare
  • Grow your array to include this spare
  • Extend your file-system to recognize this additional space
  • Save your new configuration

First lets create an “auto-detect” partition on the bare drive.  You have seen this step before, I’ll include it again to refresh your memory.  This step is essential.

$ sudo fdisk /dev/sde
Command (m for help): n
Command action
    e   extended
    p   primary partition  (1-4)
p
Partition number (1-4): 1
First cylinder (1-133674, default 1);
Using default value 1
Last cylinder, +cylinder or +size{K,M,G} (1-133674,  default 133674):
Using  default value 133674

Command (m for help): t
Selected partition 1
Hex code (type L to list codes): fd
Changed system type of partition 1 to fd (Linux raid  autodetect)

Command (m for help): w
The partition table has been altered!
Calling ioctl() to re-read partition table.
Syncing disks.

$ sudo fdisk -l
Disk /dev/sde: 1099.5 GB, 1099511627776 bytes
255 heads, 63 sectors/track, 133674 cylinders
Units = cylinders of 16065 * 512 = 8225280 bytes
Disk identifier: 0xbe84c178

Device Boot       Start         End      Blocks   Id  System
/dev/sde1               1      133674  1073736373+   fd  Linux raid autodetect

Now we will add this disk, to the our array as a spare drive.  If you merely want to add a hot spare drive to your array, you can stop after this next step.  A hot spare is a drive that is automatically used, whenever you have a failure of one of your active drives.


$ sudo mdadm --add /dev/md0 /dev/sde1

Now in this next step we will initiate the process of growing the existing array to include this new drive.  I say initiate, because this is a very lengthy process.  The data on your existing array is rewritten so that it is spread across four drives instead of three.  This will take several hours.  The good news is that your array remains online during this process.  You don’t have to endure any downtime.


$ sudo mdadm --grow /dev/md0 --raid-devices=4

You can monitor the progress with the file /proc/mdstat.  Periodically “cat” the contents of /proc/mdstat and you can see the percentage of progess.  When it has finished, you will have a four disk array, but your mounted file-system will still show its old size.  It will not automatically recognize the additional space.  You to resize your file-system so that it recognizes the additional free space.  Fortunately this step is very fast and takes only a few minutes.


$ sudo resize2fs /dev/md0

When this is done, you can do df -h and see that your file-system now has the additional free space.  What’s cool is you added lots of free space without downing your box all afternoon.

Please don’t forget to update your array configuration file.  Since you now have a four disk array instead of three, you need to let the system know to expect to see four drives instead of three. 

If you forget this step, you array will not mount after you reboot.


$ sudo mdadm --detail --scan | sudo tee  /etc/mdadm.conf
ARRAY  /dev/md0 metadata=0.90 UUID=622146c2:61b0872d:6bbacb7a:b6d31587

That is all.  Enjoy.

Creating a software RAID5 array

This is Part 2 of a series of posts where I describe building a DIY external RAID5 array.  In Part 1 I talked about the hardware components that I used.   In this post  I will show you how to configure the software RAID5.

To implement RAID5 you need a minimum of three drives.  I begin with three 1TB drives.  Each drive is 1TB in size.  When we are finished we will have a device that is 2TB in size and is fault tolerant.   If one drive should fail, we will be able to replace the failed drive and rebuild our array without losing data and continue on.

  • /dev/sdb
  • /dev/sdc
  • /dev/sdd

The first step is to partition your drives.  Linux software raid uses a special type of partition called a “Linux raid autodetect” partition (type 0xfd).  More about the “autodetect” partition later, but for now lets begin partitioning the drives.  I’ll show you how to the first drive /dev/sdb.  Repeat the same steps for drives /dev/sdc and /dev/sdd.

$ sudo fdisk /dev/sdb
Command (m for help): n
Command action
   e   extended
   p   primary partition (1-4)
p
Partition number (1-4): 1
First cylinder (1-133674, default 1);
Using default value 1
Last cylinder, +cylinder or +size{K,M,G} (1-133674, default 133674):
Using default value 133674

Command (m for help): t
Selected partition 1
Hex code (type L to list codes): fd
Changed system type of partition 1 to fd (Linux raid autodetect)

Command (m for help): w
The partition table has been altered!

Calling ioctl() to re-read partition table.
Syncing disks.

Repeat for drives /dev/sdc and /dev/sdd.  When you are done you should have three drives which look like the following.

$ sudo fdisk -l
Disk /dev/sdb: 1099.5 GB, 1099511627776 bytes
255 heads, 63 sectors/track, 133674 cylinders
Units = cylinders of 16065 * 512 = 8225280 bytes
Disk identifier: 0xbe84c178

   Device Boot      Start         End      Blocks   Id  System
/dev/sdb1               1      133674  1073736373+  fd  Linux raid autodetect
Disk /dev/sdc: 1099.5 GB, 1099511627776 bytes
255 heads, 63 sectors/track, 133674 cylinders
Units = cylinders of 16065 * 512 = 8225280 bytes
Disk identifier: 0xf70d7ba7

   Device Boot      Start         End      Blocks   Id  System
/dev/sdc1               1      133674  1073736373+  fd  Linux raid autodetect
Disk /dev/sdd: 1099.5 GB, 1099511627776 bytes
255 heads, 63 sectors/track, 133674 cylinders
Units = cylinders of 16065 * 512 = 8225280 bytes
Disk identifier: 0x681afb7b

   Device Boot      Start         End      Blocks   Id  System
/dev/sdd1               1      133674  1073736373+  fd  Linux raid autodetect

I can now combine these three partitions to create the RAID5 device /dev/md0.


$ sudo mdadm --create --verbose /dev/md0  --level=5 --raid-devices=3 /dev/sdb1 /dev/sdc1 /dev/sdd1

mdadm: layout defaults to left-symmetric
mdadm: chunk size defaults to 64K
mdadm: layout defaults to left-symmetric
mdadm: size set to 1073736256K
mdadm: array /dev/md0 started.

The previous command merely started the process of combining the three drives into a single RAID5 device.  This process will take a while to complete.  You can check it’s progress by displaying the special file /proc/mdstat.

$ cat /proc/mdstat
Personalities : [raid6] [raid5] [raid4]
md0 : active raid5 sdd1[3] sdc1[1] sdb1[0]
21474725512 blocks level 5, 64k chunk, algorithm 2 [3/2] [UU_]
[========>.............]  recovery = 35.0% (376037544/1073736256) finish=128.6min speed=90402K/sec

usused devices: <none>

From the information above, you can see that the process can take a long time depending on the size and speed of your drives.  It is 35% complete, and the ETA is 128.6 minutes.  You can continue to “cat” the /proc/mdstat file to check the progress.  When it is finished, you should see something like the following.

$ cat /proc/mdstat
Personalities : [raid6] [raid5] [raid4]
md0 : active raid5 sdd1[2] sdc1[1] sdb1[0]
      2147472512 blocks level 5, 64k chunk, algorithm 2 [3/3] [UUU]

unused devices: <none>

The raid device /dev/md0 is now ready for use.  I can now format it with a filesystem.  I choose to format it as an ext4 filesystem.  For this example I will mount it as /srv/d1.  You can mount it however you wish (i.e. /usr/local, /opt).

$ sudo mkfs.ext4 /dev/md0
$ sudo mkdir /srv/d1
$ sudo mount /dev/md0 /srv/d1

I’ll edit my /etc/fstab file and add the following line.

/dev/md0     /srv/d1   ext4      defaults      0 0

I am almost done.  However we must now save the configuration information of our array so that it can be discovered at boot time.  The following command can be used to examine your raid array and also to save its configuration to a file to be used at boot time.

$ sudo mdadm --detail --scan | sudo tee /etc/mdadm.conf
ARRAY /dev/md0 metadata=0.90 UUID=622146c2:61b0872d:6bbacb7a:b6d31587

We are now done.  The raid device has been created and mounted.  We saved its configuration so that it can be discovered and remounted after each boot.

$ df -h
Filesystem               Size  Used Avail Use% Mounted On
/dev/mapper/vg0-lv_root  9.7G  2.2G  7.5G  23% /
tmpfs                    501M  348K  501M   1% /dev/shm
/dev/sda1                194M   23M  162M  13% /boot
/dev/md0                 2.0T  199M  1.9T   1% /srv/d1

In Part 3, I will deal with growing the array by adding a disk to the array to make it a four disk array.

DIY external RAID5 array

Here is a home project I did almost a year ago and I’m very pleased with it.  I wanted to create an external drive array.  1TB drives was my choice.  Initially I built this as a 3 drive array, and within a few weeks I grew it to a 4 drive array.

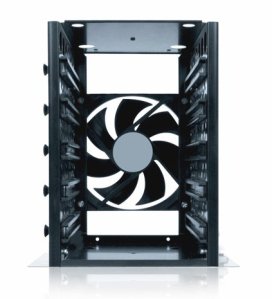
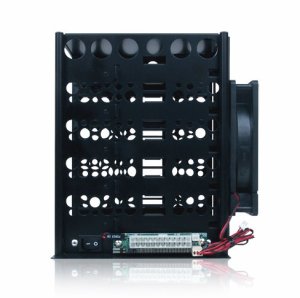
First I purchased the enclosure for about $19.  The enclosure is basically just a metal frame meant to hold up to 5 drives.  It includes a fan, although the fan is not really needed, because the ambient air is enough to cool the drives.  It has a power switch and an ATX connector. It accepts an ATX power supply to power the drives and fan.

hddrack5_frontview

Drive enclosure front view

hddrack5_sideview

Drive enclosure side view

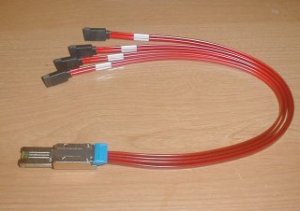
The cool thing about using SATA drives is that they use a SCSI protocol and you can use them with a SAS cable.  Rather than have four individual eSATA cables connect each drive, I found a single SAS cable that fans out to four SATA connectors.

SAS fan out cable

SAS to SATA "fanout" cable

The cable in the picture is a short version.  My cable is 1 meter in length.  I found the cable online for about $55.  The SAS cable connects to my SCSI controller card.  It’s an IBM LSI type PCI express controller.  You should be able to find them on Ebay.  The controller card is already supported by linux.


$ sudo lspci -nn

02:00.0 SCSI storage controller [0100]: LSI Logic / Symbios Logic SAS1068E PCI-Express Fusion-MPT SAS [1000:0058] (rev 08)

I’m using software raid5 built into the linux kernel, because I’m want maximum compatibility.  Also, my controller card doesn’t do RAID5.   I’m not overly concerned about speed.  This is intended to be a fault tolerant file server where I will keep music, photos, videos, backup images, and other important data.

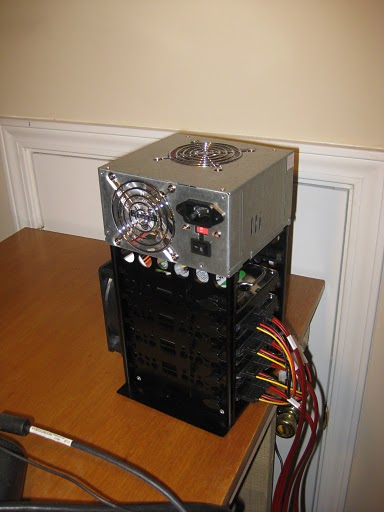
Here are photos of the finished array.

Enclosure with power supply

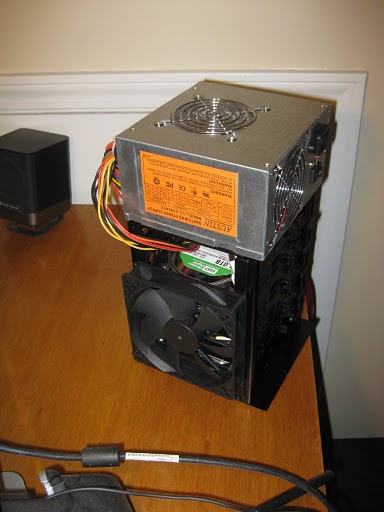
Drive Enclosure with ATX power supply atop

I used thick double faced tape to mount the ATX power supply on top of the drive array.  The total height is 11 inches.  A black power supply would have been a better choice, but I already had this one laying around and ready for use.

Enclosure_other_side

A view from the other side showing drive fan

The picture above is a view from the other side.  The extra unused molex connectors are tucked away.  I debated, removing them by opening up the power supply and cutting them away, but ultimately I left them.  The drive fan is remarkably silent.  It could probably be removed without as there is enough ambient air to cool the drives.

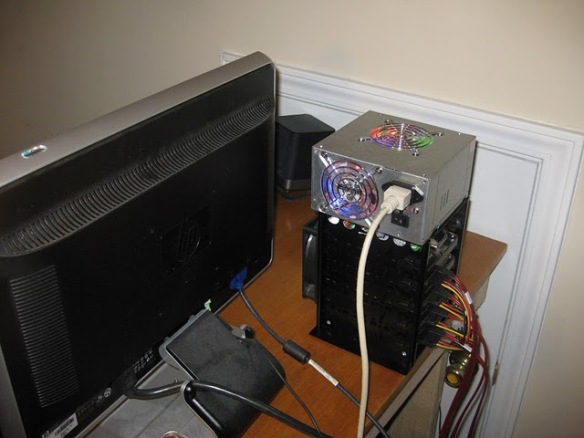
Enclosure_in_use

A view of the drive array in normal use

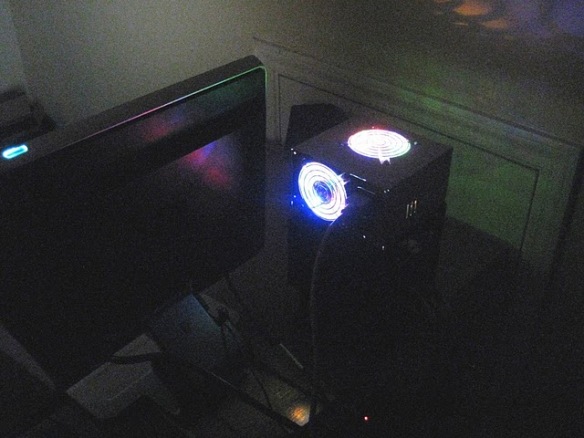
And finally a night time shot of the drive array in use.  The led lighted power supply is glowing in the night.  The camera lens adds to that affect.  The actual glow is less dramatic.

Enclosure_nighttime

A view of the drive array at night

The four drive array gives me a total of 2.7TB of fault tolerant storage.  It is currently mounted on my Fedora 12 server.  Look for more details to come in a part 2 of this series where I show how to create the RAID array and how to grow it.