Fixing Problems with Gnome Indicator Applets

If you are using gnome 2.x and you have problems with your indicator applets not displaying properly after login.   I often do.   I don’t know the reason.  It occurs sporadically and more often than not.

A simple fix is to restart gnome-panel.  You don’t need to use sudo.  Open a terminal and run the following command.


$ pkill gnome-panel

That was easy–and is usually all you need to do.

However, if that didn’t solve your problem.  You can try reseting your panels and get pristine panels again.  WARNING:  If you have customized your panels by adding application launchers and etc, you will lose those setttings and have to customize them again.

Now that you have been warned, here are the steps to reset your panels.


$ gconftool-2 --recursive-unset /apps/panel

$ rm -fr ~/.gconf/apps/panel

$ pkill gnome-panel

I hope you found this post useful.

Running VirtualBox Guest VMs In Headless Mode

If you are new to VirtualBox, you might not be aware that you can run your guest VMs without having a console window to them on your desktop.  IOW, run your guest VMs in the background and unseen.  This is called headless mode.  I’ll show you how to do that and a little more.

In headless mode, your guest VMs run in the background and you have the option to connect to them using the RDP protocol should you need a console to them.  This is great for uncluttering your desktop particularly if you run many guest VMs and you don’t care to see their console.  I have one server where I normally run at least five guest VMs at all times.  Headless mode is great when you need to log  into your host server remotely using ssh and start a guest VM.  This can be handy if you are on the road, away from your server.

Here is an example to demonstrate some common tasks.

Log into your host server using ssh.  Get a list of all VMs.

$ VBoxManage list vms

Start a guest VM named mywiki with RDP enabled and listening on port 3390.  If you plan to run multiple guest VMs in headless mode with RDP enabled, you will need to choose a unique port for each to listen on.  If you don’t specify a port, the default port is 3389.

$ nohup VBoxHeadless -s mywiki -v on -p 3390 &

Now if you want to check that your guest VM is among your running VMs

$ VBoxManage list runningvms

If you should need to connect to the console on that running VM named mywiki.  Lets assume it’s IP address is 192.168.139.10.  We are going to use rdesktop, which is a good RDP client found in most linux distros.

$ rdesktop -g 1024x768 -a 16 -5 192.168.139.10:3390 &

That should open up an nice 1024×768 window to your guest VM.  If the resolution 1024×768 is too big for you, then adjust the size to fit your needs.  The rdesktop settings “-a 16 -5” use a 16bit color depth and RDPv5.  Those settings work well for me and look good.

To view the properties of your VM use the showvminfo option.  This is handy if you want to connect your RDP client to a running VM and you don’t remember which port your VM is listening on.

$ VBoxManage showvminfo mywiki

Ok, now lets assume you have a rogue guest VM that want to shut-down and it is not responding to your request for a normal orderly shut-down.  You can power it off using VBoxManage.

$ VBoxManage contolvm mywiki poweroff

One of the things I love about VirtualBox is the amount of control you have from the cmdline.  Pretty much anything you can do from the management console can be done from the cmdline.  That is great especially if you enjoy writing scripts and want to automate some of these VirtualBox tasks.

Hopefully this will be enough to get you going.

Converting vmdk files to vdi using VBoxManage

Lets say you want to convert a VMware vmdk disk image to a VirtualBox vdi disk image.  It’s super easy. First let me mention that VirtualBox already supports vmdk files and can use them as is.  However lets continue with the original idea of converting.  I assume you already have VirtualBox installed.

If your vmdk image file is already connected to a guest VM.

  • shutdown the VM
  • remove the vmdk file from the guest VM (you can’t convert it while it is attached to a VM)

From the cmdline, use VBoxManage.   It’s a swiss army knife type of program.  You will see it used for a variety of things.

$ VBoxManage clonehd --format VDI myserver.vmdk \
/srv/d1/VirtualBox/HardDisks/myserver.vdi

That is all there is to it.

If you merely want to make a copy of a vdi disk image file, you can leave out the “–format VDI” option.  The vdi disk image files contain a UUID.  The clone process will make sure that the new output file has a different and unique UUID from the original.  If you use “cp” to make a copy of the vdi image file, you will find that the output file is unusable because it contains the same UUID as the original file.  A duplicate UUID is not acceptable to VirtualBox.

Converting ogg/vorbis to mp3

This is a simple bash shell script to convert a folder of .ogg (vorbis) files to mp3 files.  I won’t get into the advantages of one format versus another.  You may have a device that supports only mp3 files.  Therefore, you have a reason to convert .ogg files to .mp3.  There are many scripts out there that will convert ogg to mp3 but with most of them you lose all of your tags in the process.  That can be a real pain.  My script will preserve the tags of my choice and write them to the mp3 file.

The tags that I am concerned about are:

  • Artist
  • Album
  • Title
  • Genre
  • Date (year)
  • Track #

If there are other tags that you care about, then adjust the script as needed.

The shell script depends on the following packages:

  • id3v2
  • vorbis-tools
  • lame

For Ubuntu users:

$ sudo apt-get install id3v2 vorbis-tools lame

For Fedora users:

$ sudo yum install id3v2 vorbis-tools lame

Without further ado, here is the script


#!/bin/bash
# convert *.ogg files to *.mp3 files

function addtag {

ARTIST=`cat $1 | sed -e '/^.*ARTIST/!d' -e 's/^.*ARTIST=//'`
TITLE=`cat $1 | sed -e '/^.*TITLE/!d' -e 's/^.*TITLE=//'`
DATE=`cat $1 | sed -e '/^.*DATE/!d' -e 's/^.*DATE=//'`
GENRE=`cat $1 | sed -e '/^.*GENRE/!d' -e 's/^.*GENRE=//'`
TRACK=`cat $1 | sed -e '/^.*TRACKNUMBER/!d' -e 's/^.*TRACKNUMBER=//'`
ALBUM=`cat $1 | sed -e '/^.*ALBUM/!d' -e 's/^.*ALBUM=//'`

echo "artist: $ARTIST"
echo "title: $TITLE"
echo "album: $ALBUM"
echo "genre: $GENRE"
echo "date: $DATE"
echo "track: $TRACK"

id3v2 --artist "$ARTIST" --album "$ALBUM" \
--song "$TITLE" --genre "$GENRE" \
 --year "$DATE" --track "$TRACK" \
"$(basename "$1" .tag).mp3"

}

for a in *.ogg
do
ogginfo "$a" > "$(basename "$a" .ogg).tag"
oggdec -o - "$a" | lame -h -V 5 --vbr-new - "$(basename "$a" .ogg).mp3"
addtag "$(basename "$a" .ogg).tag"
rm "$(basename "$a" .ogg).tag"
done

I named the script ogg2mp3.sh.  I chose to leave the *.ogg files rather than delete them after converting them to *.mp3 files.  To use the script, I cd to a folder that contains *.ogg files, then I run the script.


$ cd ~/Music
$ ./ogg2mp3.sh

You can make the script as elaborate as you want. Hopefully it was simple enough to give you a feel of how to use the other utilities together: ogginfo, oggdec, id3v2, and lame.

Running Android Apps on your linux box

So you want run Android applications on your linux box.  Basically you’ll need three things.  The Android SDK, Java JRE, and 32bit libraries.  If your server is already a 32bit server then you already have 32bit libraries installed.  If you server is a 64bit server then you will need to install the 32bit execution libraries, for Ubuntu that is the  ia32-libs package.


$ sudo apt-get install openjdk-6-jre

$ sudo apt-get install ia32-libs

Download the Android SDK from developer.android.com

Extract and run the Android SDK.


$ tar -zxvf android-sdk_r06-linux_86.tgz

$ cd android-sdk-linux_86

$ cd tools

$ ./android &

Click on “Installed Packages” to update your tools and APIs.  Click the “Update All…” button.

I am going to select the “Android 2.2, API 8” and click Install.  This will download and install several packages.

When it finishes downloading and installing the additional packages, you should see something like the following.

Now lets create a virtual Android device.  Select “Virtual Devices” and click the “New…” button.

Select a name for your Android device.  I chose fakeDroid.  Select an API level, SD card size, and a Skin (screen size).  The Hardware section, lets you outfit your Android with various features.  I’m going to select the following:

  • SD Card support
  • GPS support
  • Accelerometer
  • DPad support
  • Touchscreen support
  • Audo playback support

Then click “Create AVD”.

This will create a virtual android device for you.  You can select your virtual device and click the Start button.

Your virtual Android will then power-on and begin botting.  When it finishes booting you should see something like the following.

Now lets install an Android application.  Click on the button that looks like a globe to start the android web browser.  You should see a web browser like the following.

Enter the URL:  http://www.androidfreeware.org

To zoom in you can double click on the Android touchscreen.  You can pan the display by using your mouse pointer to “drag” the touchscreen.  I’m going to install the application PicSay 1.3.0.7, but you can choose whatever application you want.  You install android applications by downloading the android package files with .apk extension.   You should see a link for downloading the file.

After the download begins, click and drag downward on the top menu bar.  This is where android keeps its notifications.  Soon, you should see that the download has completed.

Click on the downloaded file and it will open the installer program for that application.  Click the Install button.

When the application finishes installing, you can click the home button to go back to your Android home page.  Then click the touch screen button which looks like a grid.  That is the launcher button.  It takes you to the screen where you can launch applications.  You should see the icon for your newly installed application (PicSay).

To start the PicSay application, click its icon.   We are done here.

Have fun experimenting with the android SDK.

View your current network settings with nm-tool

A short post to tell you about a tool named nm-tool. Use nm-tool to display your current network settings. nm-tool is installed as part of the NetworkManager package.

Ubuntu: network-manager package
Fedora: NetworkManager package

As you can see it returns a lot of useful information.

$ nm-tool
NetworkManager Tool
State: connected
- Device: eth0  [Auto eth0] ----------------------------------------------------
 Type:              Wired
 Driver:            r8169
 State:             connected
 Default:           yes
 HW Address:        00:24:8C:95:28:BF
 Capabilities:
 Carrier Detect:  yes
 Speed:           100 Mb/s
 Wired Properties
 Carrier:         on
 IPv4 Settings:
 Address:         192.168.140.11
 Prefix:          24 (255.255.255.0)
 Gateway:         192.168.140.1
 DNS:             192.168.140.19
 DNS:             192.168.140.9
- Device: wlan0  [Auto stargate] -----------------------------------------------
 Type:              802.11 WiFi
 Driver:            ath5k
 State:             connected
 Default:           no
 HW Address:        00:11:6B:62:22:4C
 Capabilities:
 Speed:           54 Mb/s
 Wireless Properties
 WEP Encryption:  yes
 WPA Encryption:  yes
 WPA2 Encryption: yes
 Wireless Access Points (* = current AP)
 stargate:        Infra, 00:14:D1:4E:40:EE, Freq 2437 MHz, Rate 54 Mb/s, Strength 48 WPA2
 *stargate:       Infra, 00:1C:F0:5F:78:A5, Freq 2412 MHz, Rate 54 Mb/s, Strength 90 WPA2
 stargate:        Infra, 00:14:D1:4E:40:EE, Freq 2462 MHz, Rate 54 Mb/s, Strength 45 WPA2
 IPv4 Settings:
 Address:         192.168.142.106
 Prefix:          24 (255.255.255.0)
 Gateway:         192.168.142.1
 DNS:             192.168.140.19
 DNS:             192.168.140.9

Growing your RAID array

This is part 3 of a series of posts regarding setting up a linux RAID 5 disk array.  Let’s say you started your disk array with three drives and now you have more funds and you purchased an additional drive to increase the size of your disk array.  Adding a fourth drive to a three drive RAID 5 array will increase your storage space by 50%.  So you get a lot of bang for your buck.

Let’s continue with my example.  I started with three 1 TB SATA drives and now I’m adding a fourth 1 TB drive.  Before I had approximately 2 TB of storage, and after adding this fourth drive, I will end up with approximately 3TB of storage space.

Here are the basic steps that I will cover:

  • Partition the bare drive
  • Add the drive to your array as a spare
  • Grow your array to include this spare
  • Extend your file-system to recognize this additional space
  • Save your new configuration

First lets create an “auto-detect” partition on the bare drive.  You have seen this step before, I’ll include it again to refresh your memory.  This step is essential.

$ sudo fdisk /dev/sde
Command (m for help): n
Command action
    e   extended
    p   primary partition  (1-4)
p
Partition number (1-4): 1
First cylinder (1-133674, default 1);
Using default value 1
Last cylinder, +cylinder or +size{K,M,G} (1-133674,  default 133674):
Using  default value 133674

Command (m for help): t
Selected partition 1
Hex code (type L to list codes): fd
Changed system type of partition 1 to fd (Linux raid  autodetect)

Command (m for help): w
The partition table has been altered!
Calling ioctl() to re-read partition table.
Syncing disks.

$ sudo fdisk -l
Disk /dev/sde: 1099.5 GB, 1099511627776 bytes
255 heads, 63 sectors/track, 133674 cylinders
Units = cylinders of 16065 * 512 = 8225280 bytes
Disk identifier: 0xbe84c178

Device Boot       Start         End      Blocks   Id  System
/dev/sde1               1      133674  1073736373+   fd  Linux raid autodetect

Now we will add this disk, to the our array as a spare drive.  If you merely want to add a hot spare drive to your array, you can stop after this next step.  A hot spare is a drive that is automatically used, whenever you have a failure of one of your active drives.


$ sudo mdadm --add /dev/md0 /dev/sde1

Now in this next step we will initiate the process of growing the existing array to include this new drive.  I say initiate, because this is a very lengthy process.  The data on your existing array is rewritten so that it is spread across four drives instead of three.  This will take several hours.  The good news is that your array remains online during this process.  You don’t have to endure any downtime.


$ sudo mdadm --grow /dev/md0 --raid-devices=4

You can monitor the progress with the file /proc/mdstat.  Periodically “cat” the contents of /proc/mdstat and you can see the percentage of progess.  When it has finished, you will have a four disk array, but your mounted file-system will still show its old size.  It will not automatically recognize the additional space.  You to resize your file-system so that it recognizes the additional free space.  Fortunately this step is very fast and takes only a few minutes.


$ sudo resize2fs /dev/md0

When this is done, you can do df -h and see that your file-system now has the additional free space.  What’s cool is you added lots of free space without downing your box all afternoon.

Please don’t forget to update your array configuration file.  Since you now have a four disk array instead of three, you need to let the system know to expect to see four drives instead of three. 

If you forget this step, you array will not mount after you reboot.


$ sudo mdadm --detail --scan | sudo tee  /etc/mdadm.conf
ARRAY  /dev/md0 metadata=0.90 UUID=622146c2:61b0872d:6bbacb7a:b6d31587

That is all.  Enjoy.

Part II: VirtualBox is giving me friction about my AMD-V

This is an update to an earlier post.  In a previous post, I talked about an issue where after upgrading VirtualBox it was no longer able to run 64bit guests, on some motherboards with AMD-V capable cpus.

After digging a little more,  It seems that having the kernel modules kvm and kvm_amd loaded while running VirtualBox was causing the issue.  The presence of those two modules is causing VirtualBox to wrongly see svm as not enabled.

If you are not using kvm and kvm_amd for other things, you can blacklist those two modules to prevent them from loading.  Here is how you do that.  Create a new blacklist .conf file in the /etc/modprobe.d folder.  Then add a line to blacklist those two modules.

$ echo -e  "blacklist kvm\nblacklist kvm_amd" | sudo tee /etc/modprobe.d/blacklist-kvm.conf

Then reboot.

Before starting your guests after the reboot, first you’ll have to recompile your VirtualBox drivers.  You must do that as root.

$ sudo /etc/init.d/vboxdrv  setup
 * Stopping VirtualBox kernel module
 *  done.
 * Removing old VirtualBox netadp kernel module
 *  done.
 * Removing old VirtualBox netflt kernel module
 *  done.
 * Removing old VirtualBox kernel module
 *  done.
 * Recompiling VirtualBox kernel module
 *  done.
 * Starting VirtualBox kernel module
 *  done.

Your 64bit guests should start and run without issue as they were meant to do.   If not then make sure that you didn’t make a typo along the way.  Then verify that the two kvm modules are not loaded.  If you still can’t get it work, remember that the workaround from the previous post still works wells.

Creating a software RAID5 array

This is Part 2 of a series of posts where I describe building a DIY external RAID5 array.  In Part 1 I talked about the hardware components that I used.   In this post  I will show you how to configure the software RAID5.

To implement RAID5 you need a minimum of three drives.  I begin with three 1TB drives.  Each drive is 1TB in size.  When we are finished we will have a device that is 2TB in size and is fault tolerant.   If one drive should fail, we will be able to replace the failed drive and rebuild our array without losing data and continue on.

  • /dev/sdb
  • /dev/sdc
  • /dev/sdd

The first step is to partition your drives.  Linux software raid uses a special type of partition called a “Linux raid autodetect” partition (type 0xfd).  More about the “autodetect” partition later, but for now lets begin partitioning the drives.  I’ll show you how to the first drive /dev/sdb.  Repeat the same steps for drives /dev/sdc and /dev/sdd.

$ sudo fdisk /dev/sdb
Command (m for help): n
Command action
   e   extended
   p   primary partition (1-4)
p
Partition number (1-4): 1
First cylinder (1-133674, default 1);
Using default value 1
Last cylinder, +cylinder or +size{K,M,G} (1-133674, default 133674):
Using default value 133674

Command (m for help): t
Selected partition 1
Hex code (type L to list codes): fd
Changed system type of partition 1 to fd (Linux raid autodetect)

Command (m for help): w
The partition table has been altered!

Calling ioctl() to re-read partition table.
Syncing disks.

Repeat for drives /dev/sdc and /dev/sdd.  When you are done you should have three drives which look like the following.

$ sudo fdisk -l
Disk /dev/sdb: 1099.5 GB, 1099511627776 bytes
255 heads, 63 sectors/track, 133674 cylinders
Units = cylinders of 16065 * 512 = 8225280 bytes
Disk identifier: 0xbe84c178

   Device Boot      Start         End      Blocks   Id  System
/dev/sdb1               1      133674  1073736373+  fd  Linux raid autodetect
Disk /dev/sdc: 1099.5 GB, 1099511627776 bytes
255 heads, 63 sectors/track, 133674 cylinders
Units = cylinders of 16065 * 512 = 8225280 bytes
Disk identifier: 0xf70d7ba7

   Device Boot      Start         End      Blocks   Id  System
/dev/sdc1               1      133674  1073736373+  fd  Linux raid autodetect
Disk /dev/sdd: 1099.5 GB, 1099511627776 bytes
255 heads, 63 sectors/track, 133674 cylinders
Units = cylinders of 16065 * 512 = 8225280 bytes
Disk identifier: 0x681afb7b

   Device Boot      Start         End      Blocks   Id  System
/dev/sdd1               1      133674  1073736373+  fd  Linux raid autodetect

I can now combine these three partitions to create the RAID5 device /dev/md0.


$ sudo mdadm --create --verbose /dev/md0  --level=5 --raid-devices=3 /dev/sdb1 /dev/sdc1 /dev/sdd1

mdadm: layout defaults to left-symmetric
mdadm: chunk size defaults to 64K
mdadm: layout defaults to left-symmetric
mdadm: size set to 1073736256K
mdadm: array /dev/md0 started.

The previous command merely started the process of combining the three drives into a single RAID5 device.  This process will take a while to complete.  You can check it’s progress by displaying the special file /proc/mdstat.

$ cat /proc/mdstat
Personalities : [raid6] [raid5] [raid4]
md0 : active raid5 sdd1[3] sdc1[1] sdb1[0]
21474725512 blocks level 5, 64k chunk, algorithm 2 [3/2] [UU_]
[========>.............]  recovery = 35.0% (376037544/1073736256) finish=128.6min speed=90402K/sec

usused devices: <none>

From the information above, you can see that the process can take a long time depending on the size and speed of your drives.  It is 35% complete, and the ETA is 128.6 minutes.  You can continue to “cat” the /proc/mdstat file to check the progress.  When it is finished, you should see something like the following.

$ cat /proc/mdstat
Personalities : [raid6] [raid5] [raid4]
md0 : active raid5 sdd1[2] sdc1[1] sdb1[0]
      2147472512 blocks level 5, 64k chunk, algorithm 2 [3/3] [UUU]

unused devices: <none>

The raid device /dev/md0 is now ready for use.  I can now format it with a filesystem.  I choose to format it as an ext4 filesystem.  For this example I will mount it as /srv/d1.  You can mount it however you wish (i.e. /usr/local, /opt).

$ sudo mkfs.ext4 /dev/md0
$ sudo mkdir /srv/d1
$ sudo mount /dev/md0 /srv/d1

I’ll edit my /etc/fstab file and add the following line.

/dev/md0     /srv/d1   ext4      defaults      0 0

I am almost done.  However we must now save the configuration information of our array so that it can be discovered at boot time.  The following command can be used to examine your raid array and also to save its configuration to a file to be used at boot time.

$ sudo mdadm --detail --scan | sudo tee /etc/mdadm.conf
ARRAY /dev/md0 metadata=0.90 UUID=622146c2:61b0872d:6bbacb7a:b6d31587

We are now done.  The raid device has been created and mounted.  We saved its configuration so that it can be discovered and remounted after each boot.

$ df -h
Filesystem               Size  Used Avail Use% Mounted On
/dev/mapper/vg0-lv_root  9.7G  2.2G  7.5G  23% /
tmpfs                    501M  348K  501M   1% /dev/shm
/dev/sda1                194M   23M  162M  13% /boot
/dev/md0                 2.0T  199M  1.9T   1% /srv/d1

In Part 3, I will deal with growing the array by adding a disk to the array to make it a four disk array.

DIY external RAID5 array

Here is a home project I did almost a year ago and I’m very pleased with it.  I wanted to create an external drive array.  1TB drives was my choice.  Initially I built this as a 3 drive array, and within a few weeks I grew it to a 4 drive array.

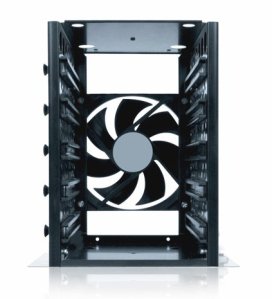
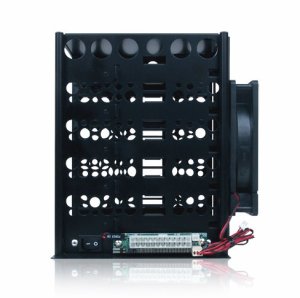
First I purchased the enclosure for about $19.  The enclosure is basically just a metal frame meant to hold up to 5 drives.  It includes a fan, although the fan is not really needed, because the ambient air is enough to cool the drives.  It has a power switch and an ATX connector. It accepts an ATX power supply to power the drives and fan.

hddrack5_frontview

Drive enclosure front view

hddrack5_sideview

Drive enclosure side view

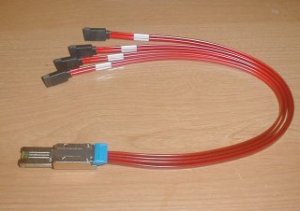
The cool thing about using SATA drives is that they use a SCSI protocol and you can use them with a SAS cable.  Rather than have four individual eSATA cables connect each drive, I found a single SAS cable that fans out to four SATA connectors.

SAS fan out cable

SAS to SATA "fanout" cable

The cable in the picture is a short version.  My cable is 1 meter in length.  I found the cable online for about $55.  The SAS cable connects to my SCSI controller card.  It’s an IBM LSI type PCI express controller.  You should be able to find them on Ebay.  The controller card is already supported by linux.


$ sudo lspci -nn

02:00.0 SCSI storage controller [0100]: LSI Logic / Symbios Logic SAS1068E PCI-Express Fusion-MPT SAS [1000:0058] (rev 08)

I’m using software raid5 built into the linux kernel, because I’m want maximum compatibility.  Also, my controller card doesn’t do RAID5.   I’m not overly concerned about speed.  This is intended to be a fault tolerant file server where I will keep music, photos, videos, backup images, and other important data.

Here are photos of the finished array.

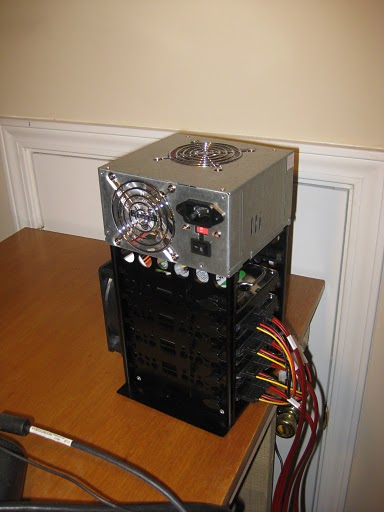
Enclosure with power supply

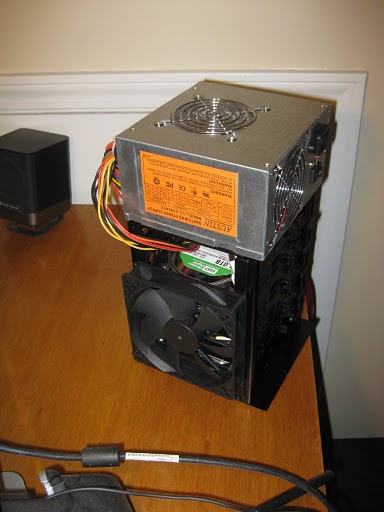
Drive Enclosure with ATX power supply atop

I used thick double faced tape to mount the ATX power supply on top of the drive array.  The total height is 11 inches.  A black power supply would have been a better choice, but I already had this one laying around and ready for use.

Enclosure_other_side

A view from the other side showing drive fan

The picture above is a view from the other side.  The extra unused molex connectors are tucked away.  I debated, removing them by opening up the power supply and cutting them away, but ultimately I left them.  The drive fan is remarkably silent.  It could probably be removed without as there is enough ambient air to cool the drives.

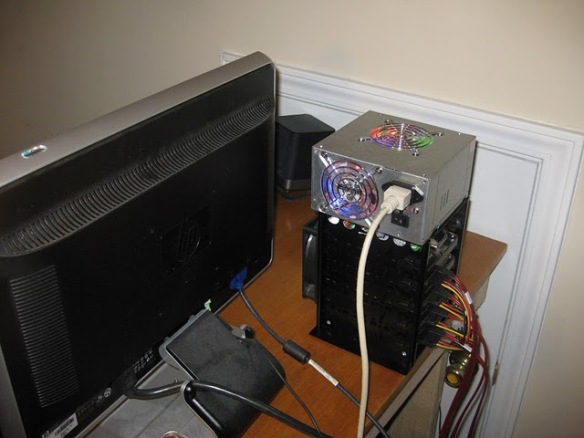
Enclosure_in_use

A view of the drive array in normal use

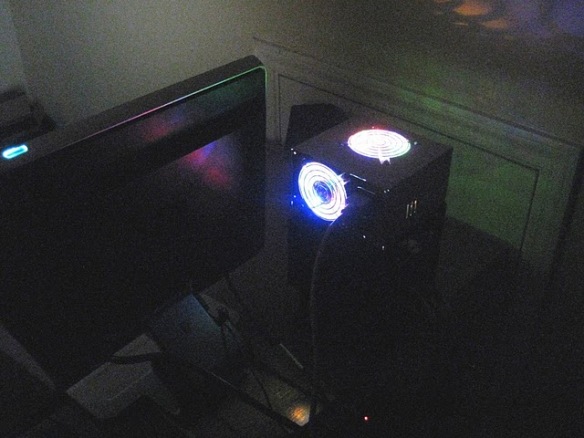
And finally a night time shot of the drive array in use.  The led lighted power supply is glowing in the night.  The camera lens adds to that affect.  The actual glow is less dramatic.

Enclosure_nighttime

A view of the drive array at night

The four drive array gives me a total of 2.7TB of fault tolerant storage.  It is currently mounted on my Fedora 12 server.  Look for more details to come in a part 2 of this series where I show how to create the RAID array and how to grow it.